Azure Storage - Data Security and Authentication
Previously in the series, we have concentrated on the types of storage accounts available and their various roles. Now we are going to look at how to ensure that your data is secure and only services you have authorized can access it.
Encryption
The data stored with Azure storage is encrypted at rest by default. The data is decrypted transparently when you or your authorized services access it. All data tiers and redundancy options have encryption enabled to ensure your data is secure. This encryption extends to the object metadata as well.
The default configuration uses a Microsoft service to manage the encryption keys for your storage accounts. This management is all done behind the scenes with no direct involvement. You can, however, enable customer-managed keys. This gives additional flexibility and auditing capabilities as required. These custom keys can be generated and managed using Azure Key Vault.
On top of the storage account encryption, full disk encryption is available for the virtual hard disks of your virtual machines. This also integrates into Azure Key Vault for managing the keys but uses industry-standard Full Disk Encryption technologies for the specific operating systems.
As previously discussed, the individual data objects can be accessed by URIs, so depending on your authorization policies, your data can be exposed directly to the internet.
Authentication
Depending on the usage of the storage accounts, there are various methods for authentication Microsoft provides so users or applications can access the information they are authorized to see.
Access Keys
For connecting to the azure storage account, Microsoft provides access keys. These can be used to authenticate your applications when requesting data from the storage accounts.
Microsoft highly recommends that you rotate these keys regularly to ensure you maintain security. To assist in this key rotation, Microsoft provides two sets of keys. As long as your application can cope with multiple connection strings, this means you can rotate one key while maintaining the connection to the data source using the second key.
AzureAD
For requests to Blob and Queue services, Microsoft also provides integration with Azure AD for identity-based authorization. You can grant access to individual queues or containers using the RBAC (role-based access control). This enables you to grant granular access (Owner, Contributor, Reader, or Delegator) to your storage accounts for specific Azure AD account.
Shared Access Signature (Delegated Access)
If you have clients or users that you do not want to trust with your full storage account keys but need to give access to specific resources, you can use a shared access signature (SAS). A SAS grants access to specific Azure storage resources in the form of a URI.
A SAS can be set at the account or service level, allowing access to the whole set of services or specifics resource types. Within the last 12 months, Microsoft has also introduced user delegation SAS which is additionally secured by Azure AD credentials.
If you use SAS access, you can use the access policies alongside the URI to control permissions and access times of the data resources under your control. Using an Access Policy allows you to set specific start and expiry times for accessing containers, file shares, queue, or tables.
Networking
In addition to using access keys for authentication to restrict access to your data, you can also use the Firewall and Virtual Network settings to restrict further access to specific networks and IP ranges.
As previously mentioned by default, a storage account can be accessed from anywhere on the Internet using the URI for the specific data containers. Using the firewall, you can restrict access to specific IP addresses or ranges, ensuring that only people from specific locations can access your data. There are also a few exceptions to note, the primary one to know about is “Allow trusted Microsoft services to access this storage account” this setting grants access to several Microsoft services, e.g., Azure Backup or Azure File Sync to access the storage account if they are deployed into the subscription.
To restrict access within the Azure subscription to a subset of your services, you can also place the storage account within a virtual network. This is a private IP space that enables various Azure resources to communicate securely with each other, and this private IP range can then be secured by a Network Security Group (NSG) to manage the ingress and egress rules.
For more information around various security options within Azure, I recommend the Skylines AZ-500 course. Dwayne and Nick go into much more detail around all the security features, including VNets and firewalls.
Example
We are now going to create a small environment with a storage account to explorer the various authentication methods.
Firstly, we need to create the test environment which comprises two VMs and storage account that share a single VNet. These components are placed in a single resource group along with any other resource to ensure quick clean up after completing the investigation.
There are many wises to create the required resources within Azure. You can use the UI, IaC technologies, i.e. ARM Templates (see the blog series from Shannon Kuehn), Terraform (see the Skylines Course about getting started with Terraform), or you can use the command line with either Azure CLI or PowerShell. Below are the steps using PowerShell.
1. Create Resource Group, Networking, and boot diagnostics storage account
Before we can create any of the Virtual Machines or Storage accounts, we need to create the Resource Group and the Networking components used by the azure services.
# Create Resource Group
$resourceGroup  = "Skylines-FileShare"
$locationName  = "westeurope"
New-AzResourceGroup -Name $resourceGroup -Location $locationName
# Create Diagnostic storage account
$resourceNamePrefix = "SL-FileShare"
$storageName = (($resourceNamePrefix.toLower() -replace '-') + 'diag')
New-AzStorageAccount -ResourceGroupName $resourceGroup -Name $storageName -Location $locationName -SkuName Standard_LRS -Kind StorageV2
# Create Vnet and NSG for use by VMs and Storage account
$SubnetName = $vmNamePrefix + "Subnet"
$SubnetAddressPrefix = "10.0.0.0/24"
$VnetAddressPrefix = "10.0.0.0/16"
# Code snippet taken from https://gallery.technet.microsoft.com/scriptcenter/Get-ExternalPublic-IP-c1b601bb to find the current External IP Address to be used for Firewall Access rules.
$ExternalIPAddress = Invoke-RestMethod http://ipinfo.io/json | Select -exp ip
# Create Vnet with Subnet and NSG configurations. Adding RDP access rule to NSG from the current external IP address
$SingleSubnet = New-AzVirtualNetworkSubnetConfig -Name $SubnetName -AddressPrefix $SubnetAddressPrefix
$Vnet = New-AzVirtualNetwork -Name $resourceNamePrefix'-vnet'  -ResourceGroupName $resourceGroup -Location $locationName  -AddressPrefix $VnetAddressPrefix -Subnet $SingleSubnet
$NSG = New-AzNetworkSecurityGroup -Name $resourceNamePrefix'-nsg' -ResourceGroupName $resourceGroup -Location $locationName
$NSG | Add-AzNetworkSecurityRuleConfig -Name Allow_3389 -Description "Allow port 3389 for RDP access" -Protocol Tcp -Direction Inbound -Priority 100 -SourceAddressPrefix $ExternalIPAddress -SourcePortRange * -DestinationAddressPrefix * -DestinationPortRange 3389 -Access Allow | Set-AzNetworkSecurityGroup
2. Create 2 VMs using the VNet already created.
To keep costs down, I am creating small burstable VMs. These machines aren’t heavily utilized, so the size should be adequate for the load.
The Powershell commands below also configure the VM to use Standard_LRS storage for the managed disks and also configures the auto-shutdown option within the VM. By default the auto-shutdown is disabled, and the managed disks would be on premium SSD storage. These extra steps mean I minimize charges for the test environment if I accidentally keep it running after I am finished using it.
# Create 2 VMs by looping for loop
$Credential = Get-Credential
$vmSize  = "Standard_B1s"
$shutdownTime = "1900"
$shutdownTimezone = "GMT Standard Time"
$vmAmount = 2
For ($i=0; $i -lt $vmAmount; $i++)
{
    $vmName = $resourceNamePrefix  + "-" + $i
    $nicName = $vmName + "-nic"
    $ipName = $vmName + "-ip"
    # Create Public IP and NIC
    $IP = New-AzPublicIpAddress -Name $ipName -ResourceGroupName $resourceGroup -AllocationMethod Dynamic -Location $locationName
    $NIC = New-AzNetworkInterface -Name $nicName -ResourceGroupName $resourceGroup -Location $locationName  -SubnetId $Vnet.Subnets[0].Id -PublicIpAddressId $IP.id -NetworkSecurityGroupId $NSG.id
    # Create VM Config, by default premium SSD disk are used by VMs to keep costs down you can update the VMOSDisk config to use Standard_LRS disks

    $vmConfig = New-AzVMConfig -VMName $vmName -VMSize $vmSize
    $vmConfig = Set-AzVMOperatingSystem -VM $vmConfig -Windows -ComputerName $vmName -Credential $Credential -ProvisionVMAgent -EnableAutoUpdate
    $vmConfig = Add-AzVMNetworkInterface -VM $vmConfig -Id $NIC.Id
    $vmConfig = Set-AzVMSourceImage -VM $vmConfig -PublisherName 'MicrosoftWindowsServer' -Offer 'WindowsServer' -Skus '2019-Datacenter' -Version latest
    $vmConfig = Set-AzVMOSDisk -VM $vmConfig -StorageAccountType 'Standard_LRS' -DiskSizeInGB 128 -CreateOption FromImage -Windows
    $vmConfig = Set-AzVMBootDiagnostic -VM $vmConfig -Enable -ResourceGroupName $resourceGroup -StorageAccountName $storageName
    # Create VM using the vmConfig
    New-AzVM -ResourceGroupName $resourceGroup -Location $locationName  -VM $vmConfig -Verbose

    # following code is taken from https://gallery.technet.microsoft.com/scriptcenter/Enable-or-disable-auto-c7837c84. Enables the auto-shutdown options for the VM.

    $properties = @{
        "status" = "Enabled";
        "taskType" = "ComputeVmShutdownTask";
        "dailyRecurrence" = @{"time" = $shutdownTime };
        "timeZoneId" = $shutdownTimezone;
        "notificationSettings" = @{
            "status" = "Disabled";
            "timeInMinutes" = 30
        }
        "targetResourceId" = (Get-AzVM -ResourceGroupName $resourceGroup -Name $vmName).Id
    }
    New-AzResource -ResourceId ("/subscriptions/" -f (Get-AzContext).Subscription.Id, $resourceGroup, $vmName) -Location (Get-AzVM -ResourceGroupName $resourceGroup -Name $vmName).Location -Properties $properties -Force
}
3. Create new test storage account, this storage account will have access to the same VNet.
#Create Storage Account
$storageaccount = (($resourceNamePrefix.toLower() -replace '-') + 'test')
$storAcct = New-AzStorageAccount -ResourceGroupName $resourceGroup -Name $storageaccount -Location $locationName -SkuName Standard_LRS -Kind StorageV2

Update-AzStorageAccountNetworkRuleSet -ResourceGroupName $resourceGroup -Name $storageaccount -DefaultAction Deny

#Create Service Endpoint in vnet for use with Storage accounts
$vnet = Set-AzVirtualNetworkSubnetConfig -Name $SubnetName -AddressPrefix   $SubnetAddressPrefix -VirtualNetwork  $vnet -ServiceEndpoint 'Microsoft.Storage';
$vnet = Set-AzVirtualNetwork -VirtualNetwork $vnet
# Add a network rule for a virtual network and subnet.
$subnet = Get-AzVirtualNetwork -ResourceGroupName $resourceGroup -Name $resourceNamePrefix'-vnet' | Get-AzVirtualNetworkSubnetConfig -Name $SubnetName
Add-AzStorageAccountNetworkRule -ResourceGroupName $resourceGroup -Name $storageaccount -VirtualNetworkResourceId $subnet.Id
Add-AzStorageAccountNetworkRule -ResourceGroupName $resourceGroup -Name $storageaccount -IPAddressOrRange $ExternalIPAddress

# Create Fileshare within new Storage account
$shareName = "sltestshare"
$share = New-AzStorageShare -Context $storAcct.Context -Name $shareName
Now you should have created a resource group containing 2 VMs, 2 storage accounts, and associated networking.
4. Connect to File share from VMs
From the UI, you can find a command that will allow you to connect to the file share via PowerShell. It is found under the file share overview tab there is an option for “Connect” which will provide the connection commands.
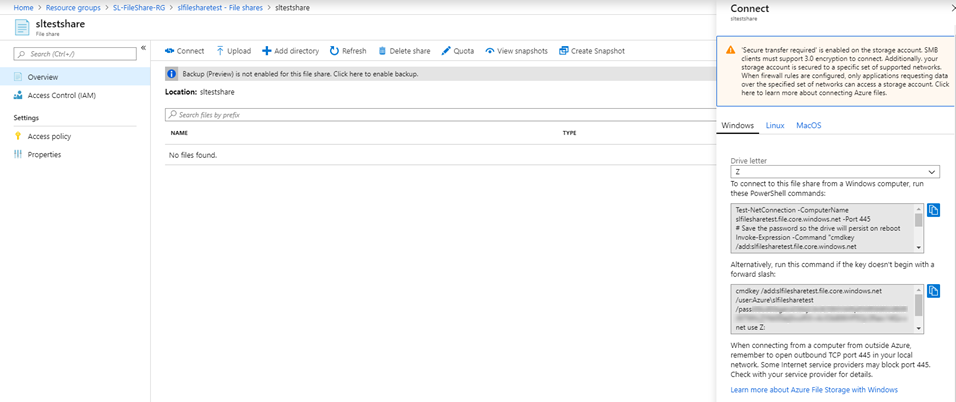
Modifying the New-PSDrive command with the -Persist flag means the file share appears within the File Explorer.
Test-NetConnection -ComputerName slfilesharetest.file.core.windows.net -Port 445
# Save the password so the drive will persist on reboot
Invoke-Expression -Command "cmdkey /add:slfilesharetest.file.core.windows.net /user:Azure\slfilesharetest /pass:<FILESHARE ACCESS KEY>"
# Mount the drive
New-PSDrive -Name Z -PSProvider FileSystem -Root "\\slfilesharetest.file.core.windows.net\sltestshare" -Persist

Once run, the file explorer shows the drive mapped to drive Z: any changes done on one machine are visible in the mapped drive on the other machine showing the file share is working correctly.

5. Local File share
As part of the setup, we allowed connections to the file share from the public IP address. Running the connection commands from a local PowerShell window will give the same results as the previous step. Connections from other locations would be still be restricted even if coming from a second VNet within Azure, as shown in step 7.
If your external IP does change, then you receive a network error due to the communication restrictions.

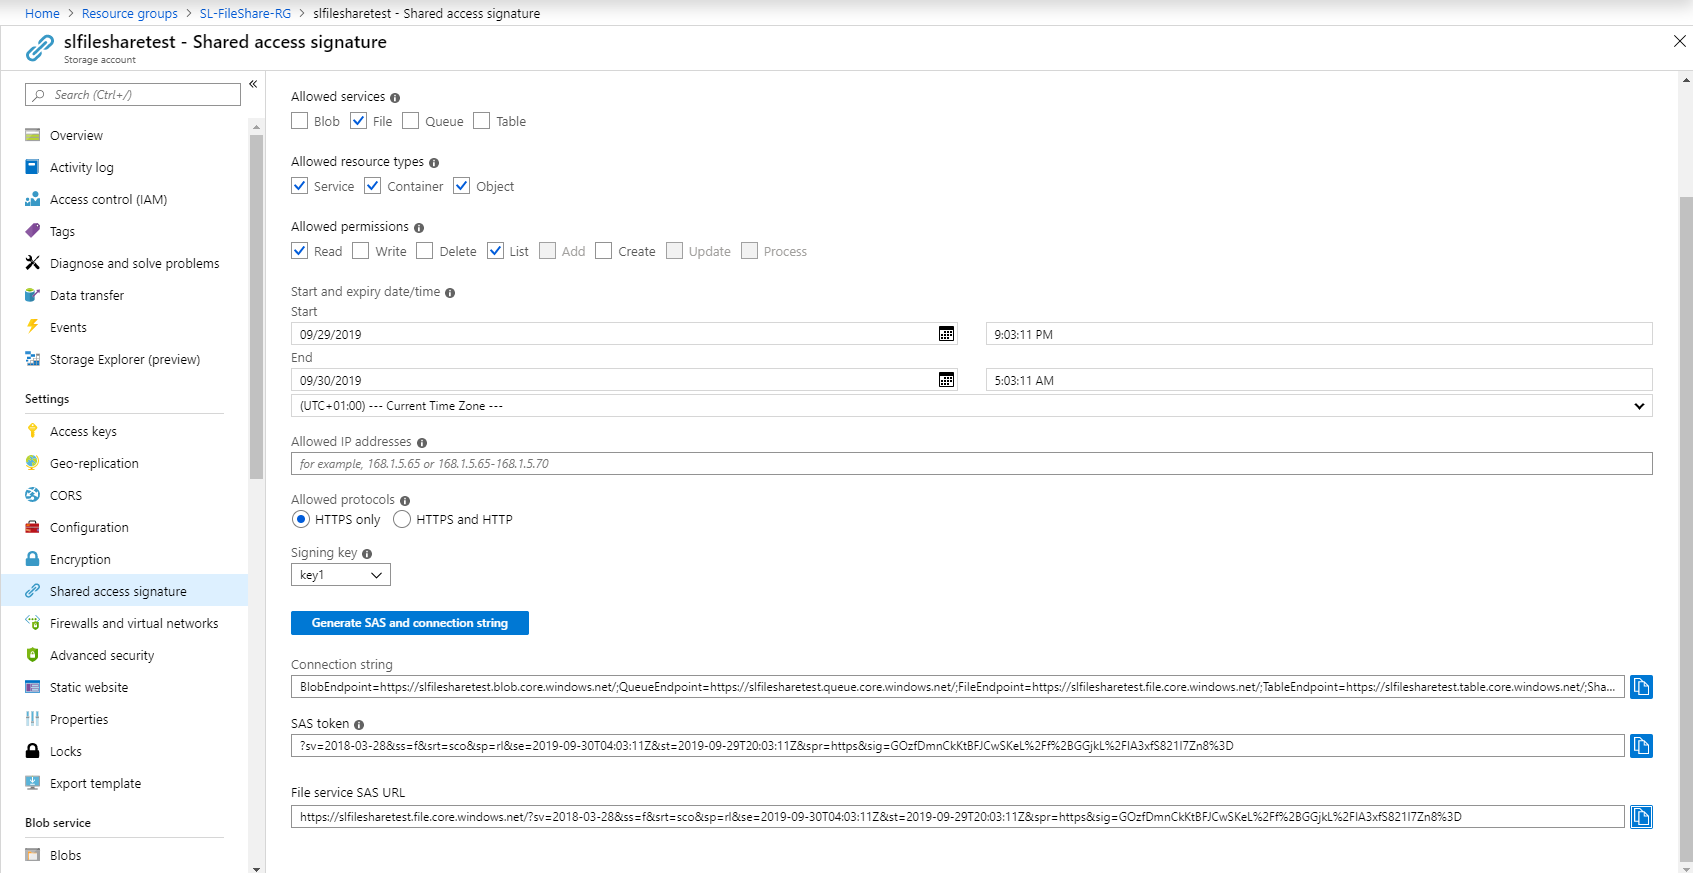
6. SAS URI usage via Storage Explorer
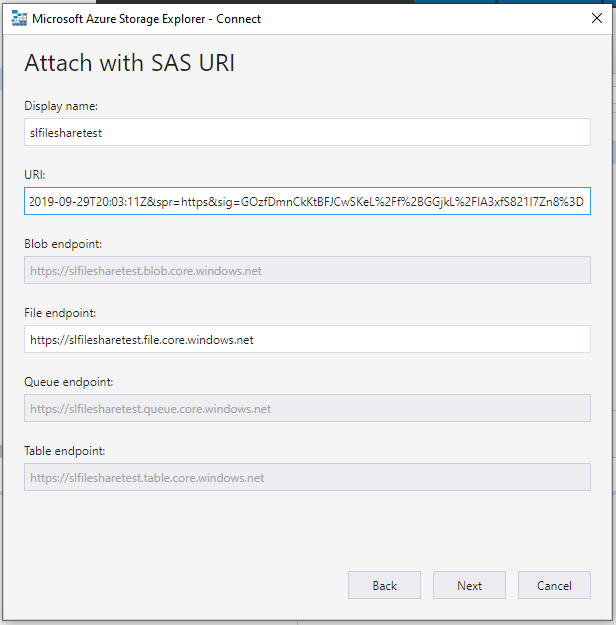
Looking at the behavior of the UI for the SAS URI creation, you can specify services, permissions, start date, and expiry date. The URI can then be used in applications like the Azure Storage Explorer.
For this example, I have created a URI that is valid to read files services and nothing else.
Once the SAS URI has been created, launching the Azure Storage Explorer you can enter it in the Connect menu
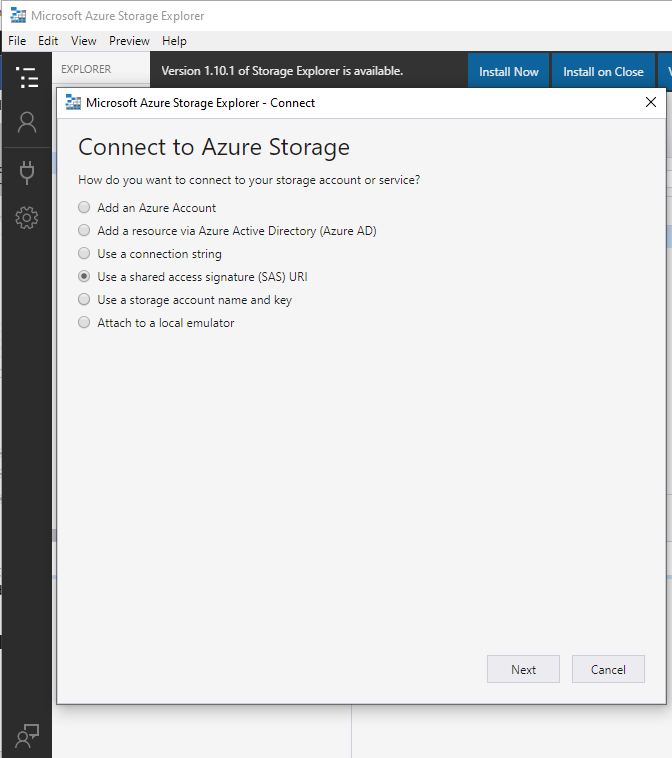
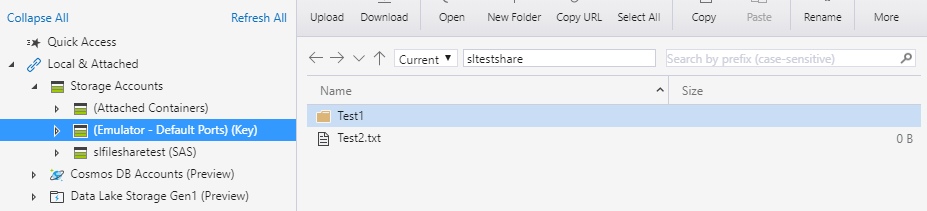
Once connected you can see the test files created in earlier steps, but due to the read-only permissions and attempts to modify or create files results in errors

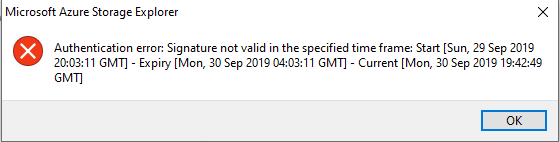
Once the time period has passed when trying to access the storage account you receive an error message similar to the one below.
7. Create an additional Server in a separate VNet.
For the final step to see in the internal security working between VNets, we create a third virtual machine in a different VNet. You can repurpose the code from early steps just changing the following two variables from:
$vmAmount = 2
$vmNamePrefix = "SL-FileShare"
To the following:
$vmAmount = 1
$vmNamePrefix = "SL-FileShare2"
Once changed, rerun the VM and Network creation steps to create the necessary resources.
Attempting to configure the Azure Storage Fileshare using the commands from step 4 fails on the new machine, due to the restrictions on communication between the VNets.

8. Clean up.
The final step is to clean up the resources. If you have created all the resources in a single Resource Group, then clean is a single line command.
Remove-AzResourceGroup -Name $resourceGroup -Force
— Matt Boyd